Forget everything you know about the compliant, pillowy softness of a standard brioche. We are entering the realm of the structural engineer where the grain is stubborn and the pentosans are king. Rye is not a flour that asks for permission; it demands a rigorous audit of your hydration levels and your patience. When you craft a Twisted Rye Loaf, you are not merely baking. You are managing a complex matrix of non-starch polysaccharides that want to turn your dough into a concrete slab. The goal here is a high-tensile strength crumb wrapped in a crust that shatters like volcanic glass. We want that deep, caraway-infused aroma to permeate the air before the oven door even swings open. This is about the visceral satisfaction of tearing into a spiralized architecture that balances the earthy, fermented funk of rye with the structural integrity of high-protein bread flour. It is time to stop playing with dough and start mastering the physics of the grain.
THE DATA MATRIX
| Metric | Specification |
|---|---|
| Prep Time | 45 Minutes |
| Execution Time | 4 Hours (including proofing) |
| Yield | 1 Large Sculpted Loaf |
| Complexity (1-10) | 8 |
| Estimated Cost per Serving | $1.15 |
THE GATHERS
Ingredient Protocol:
- 350g / 2.75 cups Dark Rye Flour (Organic, Stone-ground)
- 250g / 2 cups High-Protein Bread Flour (12.7% protein minimum)
- 380ml / 1.6 cups Filtered Water (Heated to exactly 35C / 95F)
- 12g / 2 tsp Fine Sea Salt
- 7g / 2.25 tsp Instant Yeast
- 30ml / 2 tbsp Blackstrap Molasses
- 15g / 1 tbsp Caraway Seeds (Toasted and lightly bruised)
- 20g / 1.5 tbsp Unsalted Butter (Room temperature)
Section A: Ingredient Quality Audit:
The primary failure point in rye-heavy breads is the "Rye Slime" effect caused by excessive pentosan breakdown. If your rye flour smells musty or lacks a sharp, cereal-like punch, it has likely oxidized; discard it immediately. If your bread flour has a protein content lower than 12 percent, the Twisted Rye Loaf will lack the structural scaffolding required to maintain its spiral shape during the final proof. To fix a low-protein flour on the fly, replace 10 grams of the flour with vital wheat gluten. If your water is heavily chlorinated, it will inhibit yeast activity. Use a charcoal filter or boil the water and let it cool to the target temperature to ensure the microbial environment remains optimal for fermentation.
THE MASTERCLASS
1. Hydration and Autolyse
Combine the rye flour, bread flour, and water in a ceramic bowl. Mix until no dry pockets remain. Cover and allow the mixture to rest for 40 minutes.
Pro Tip: This stage allows the pentosans in the rye to fully hydrate without the interference of salt or yeast. Use a digital scale for this step because volumetric measurements are the enemy of consistency in high-hydration doughs.
2. The Primary Fermentation
Incorporate the yeast, molasses, salt, and bruised caraway seeds. Knead the dough using a "slap and fold" technique for 8 minutes until the dough gains a slight sheen.
Pro Tip: Rye lacks the elastic gluten of wheat. You are looking for a viscous consistency rather than a traditional "windowpane" stretch. Use a bench scraper to manage the sticky dough without adding excess flour, which would ruin the hydration ratio.
3. Structural Lamination
Once the dough has doubled in size, turn it out onto a lightly floured surface. Roll it into a long rectangle, spread the softened butter across the surface, and fold it into thirds like a letter.
Pro Tip: This creates internal layers that will define the "twisted" aesthetic. The butter acts as a barrier, preventing the layers from fusing back into a monolithic mass during the bake.
4. The Spiral Architecture
Cut the folded dough into three long strips, leaving them attached at one end. Braid them tightly, then twist the entire braid onto itself to create a high-tension spiral.
Pro Tip: Tension is the key to a vertical spring. If the twist is too loose, the loaf will flatten. Use a digital thermometer to ensure the dough's internal temperature stays around 24C (75F) to prevent the butter from melting prematurely.
5. The Thermal Transformation
Preheat your oven to 220C (425F) with a heavy cast-iron Dutch oven inside. Transfer the loaf into the pot, spray the surface with a fine mist of water, and bake covered for 25 minutes. Remove the lid and bake for another 15 minutes.
Pro Tip: The steam trapped inside the Dutch oven delays the crust formation, allowing the loaf to aerate and expand fully. This is known as "oven spring" and is vital for a light, open crumb.
Section B: Prep & Timing Fault-Lines:
The most common human error is the "Short-Proof." If you rush the second rise because your kitchen is cold, the loaf will rupture at the base during baking. Conversely, if you over-proof, the gas bubbles will merge and collapse, resulting in a dense, leaden brick. Use a proofing box or the "finger-poke test." If the dough springs back slowly and leaves a slight indentation, it is ready. If it bounces back instantly, it needs more time. If it deflates, you have waited too long and must reshape and re-proof, though the final texture will suffer.
THE VISUAL SPECTRUM
Section C: Thermal & Visual Troubleshooting:
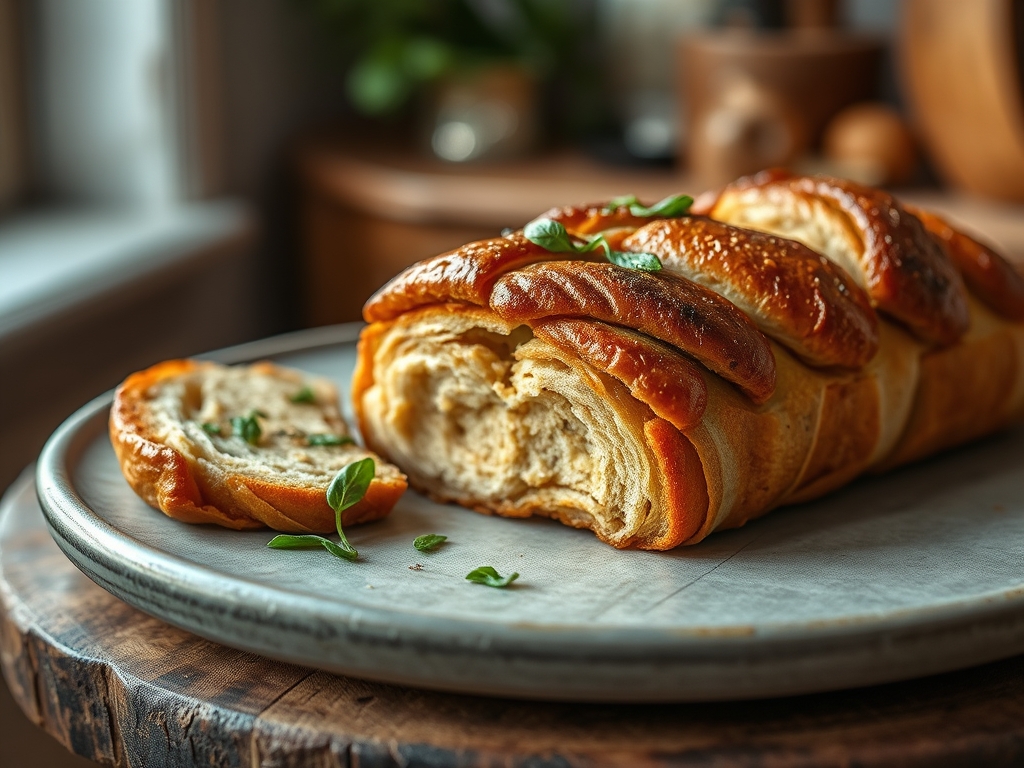
Look at the reference image. Notice the deep, mahogany hue and the distinct separation of the twisted strands. If your loaf is pale, your oven temperature was likely too low or your molasses was under-concentrated, failing to trigger the necessary Maillard reaction. If the "twists" have disappeared into a smooth dome, you likely over-handled the dough during the shaping phase, destroying the lamination. A dull, matte finish indicates a lack of steam during the first half of the bake; ensure you are using a preheated vessel or a steam-injection system to achieve that professional, glassy sheen.
THE DEEP DIVE
Macro Nutrition Profile:
A single slice (approx. 50g) provides 140 calories, 4g of protein, 2g of fiber, and 1.5g of fat. The high fiber content from the dark rye ensures a lower glycemic index compared to white breads, providing sustained energy release.
Dietary Swaps:
- Vegan: Replace the butter with a high-quality refined coconut oil or vegan margarine. Ensure the molasses is unsulphured.
- Keto: This is a grain-based loaf; a true Keto version is impossible. However, replacing 30 percent of the flour with flaxseed meal can reduce the net carb count slightly.
- GF: Use a commercial 1-to-1 gluten-free flour blend and add 10g of psyllium husk to mimic the viscous properties of rye.
Meal Prep & Reheating Science:
To maintain the molecular structure, never refrigerate this bread; the cold temperature accelerates starch retrogradation, making it stale. Store at room temperature in a paper bag for 3 days. To reheat, use a toaster oven at 175C (350F) for 4 minutes to recrystallize the starches and restore the crust's snap.
THE KITCHEN TABLE
Why is my rye dough so sticky?
Rye contains high levels of pentosans (mucilaginous carbohydrates) that absorb vast amounts of water. Do not add more flour; instead, use wet hands or a bench scraper to handle the dough. The stickiness is a sign of proper hydration.
Can I skip the caraway seeds?
You can, but you lose the piquant counterpoint to the earthy rye. If you dislike caraway, substitute with fennel seeds or anise for a different aromatic profile that still complements the fermented notes of the grain.
What is the best way to slice this loaf?
Wait at least two hours after baking. Rye bread continues to set its internal structure as it cools. Slicing too early will result in a gummy, "squashed" crumb. Use a high-quality serrated bread knife with a sawing motion.
My loaf didn't rise much in the oven. Why?
This is usually due to "dead" yeast or an under-preheated oven. Always bloom your yeast in warm water first if you are unsure of its viability. Ensure your oven reaches the target temperature before the loaf enters the chamber.