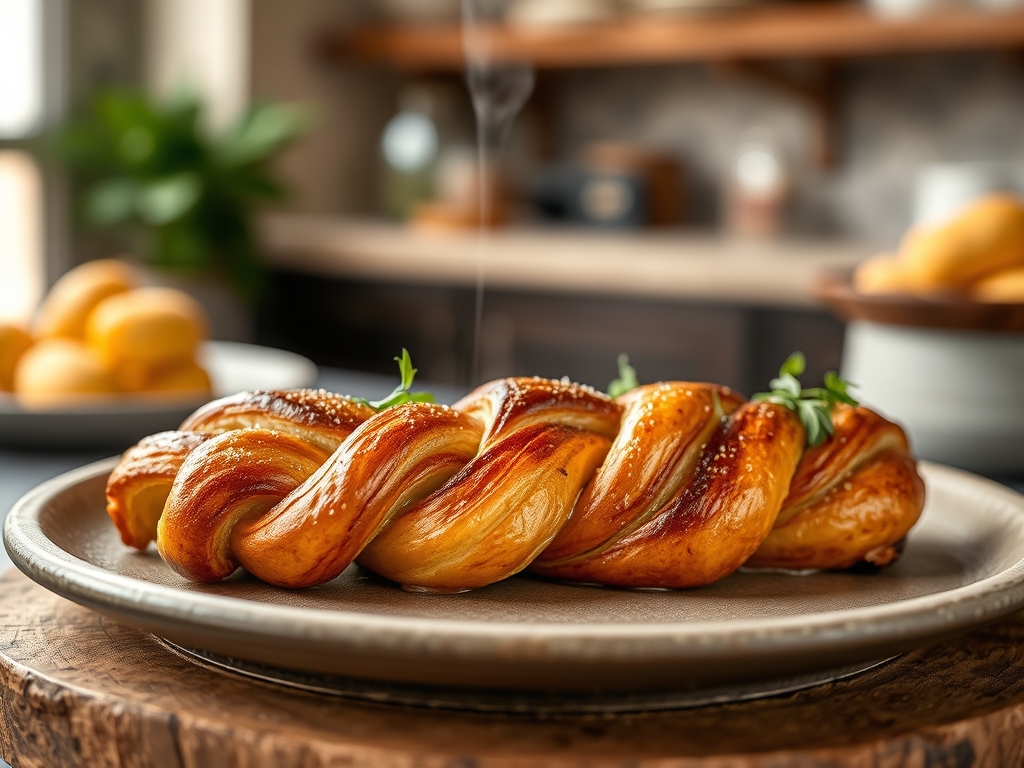
Listen closely because we are about to dissect the structural integrity of the ultimate breakfast architecture. We are moving beyond the realm of basic bread and entering the high-stakes world of the Braided Danish Pastry. This is not just a snack; it is a multi-layered engineering marvel where cold lipids meet gluten lattices in a choreographed dance of thermal expansion. Imagine the scent of high-fat European butter hitting the furnace of your oven. The water content in the butter vaporizes instantly, forcing the thin sheets of dough upward to create a shattered-glass texture that crumbles at the slightest provocation. Inside that golden, braided cage sits a piquant fruit filling, its acidity carefully balanced to prevent the structural collapse of the surrounding crumb. This is a technical audit of flavor, friction, and fermentation. If you are looking for a casual weekend bake, turn back now. We are here to achieve lamination perfection, ensuring every fold is a testament to precision and every bite is a visceral explosion of sweetness and salt.
THE DATA MATRIX
| Metric | Specification |
|---|---|
| Prep Time | 45 Minutes (Active) |
| Execution Time | 14 Hours (Includes Chilling) |
| Yield | 2 Large Braided Loaves |
| Complexity (1-10) | 8.5 (Advanced Lamination) |
| Estimated Cost per Serving | $1.45 USD |
THE GATHERS
Ingredient Protocol:
- 500g / 4 cups All-Purpose Flour (11.5% protein content)
- 10g / 2 tsp Fine Sea Salt
- 50g / 1/4 cup Granulated Sugar
- 10g / 1 tbsp Instant Yeast
- 250ml / 1 cup Whole Milk (chilled to 4 degrees Celsius)
- 1 Large Egg (beaten)
- 250g / 1 cup Unsalted European-style Butter (minimum 82% butterfat)
- 200g / 3/4 cup Raspberry or Apricot Jam (high solids content)
- 100g / 1/2 cup Cream Cheese (room temperature)
- 1 Egg + 15ml / 1 tbsp Water (for the egg wash)
Section A: Ingredient Quality Audit:
The primary failure point in a Braided Danish Pastry is the butter. If you use standard grocery store butter with high water content, your layers will fuse into a greasy brioche rather than distinct flakes. Technical Fix: Always source European-style butter. If the butter feels waxy or shatters when cold, it lacks the plastic elasticity required for lamination. To fix brittle butter, beat it with a rolling pin between parchment sheets to render it pliable without melting the crystalline fat structure. Furthermore, ensure your yeast is not expired by performing a bloom test in warm milk. If it does not aerate and foam within five minutes, discard it immediately. Sub-par flour with low protein will result in a weak gluten net that cannot support the weight of the fruit acid, leading to a soggy bottom. Use a digital scale to ensure your ratios are exact; volume measurements are the enemy of consistency.
THE MASTERCLASS
1. The Detrempe Formation
Combine your flour, sugar, salt, and yeast in a stand mixer. Slowly infuse the chilled milk and egg into the dry base. Mix on low speed until a shaggy mass forms. Do not overwork the dough at this stage; we want minimal gluten development to keep the final pastry tender. Use a bench scraper to move the dough onto a floured surface, shape it into a flat rectangle, and wrap it tightly in plastic.
Pro Tip: Keeping the dough at 4 degrees Celsius inhibits premature yeast activity. This cold fermentation ensures the dough remains stable during the high-pressure rolling process.
2. The Butter Block (Beurrage)
Place your cold butter between two sheets of parchment paper. Use a heavy rolling pin to pound the butter into a consistent 15cm square. It must be the same consistency as the dough; if the butter is harder than the dough, it will tear through the layers. If it is softer, it will leak out.
Pro Tip: Use a digital scale to verify the weight of your butter block. Precision in the fat-to-flour ratio is what determines the success of the Maillard reaction during the bake.
3. The Enclosure and First Turn
Roll your chilled dough into a 30cm square. Place the butter block diagonally in the center. Fold the corners of the dough over the butter like an envelope, sealing the edges. Roll the package into a long rectangle and perform a "letter fold" by folding the top third down and the bottom third up.
Pro Tip: Use a bench scraper to keep your edges perfectly square. Sharp 90-degree angles prevent uneven dough distribution, which causes some sections of the braid to be doughy while others are dry.
4. The Lamination Cycle
Repeat the rolling and folding process two more times, chilling the dough for at least 30 minutes between each turn. This creates 27 distinct layers of butter. After the final turn, the dough must rest in the refrigerator for at least four hours, or ideally overnight, to relax the gluten and solidify the fat.
Pro Tip: Chilling is not a suggestion; it is a thermal necessity. If the butter reaches its melting point before it enters the oven, the lamination is compromised and the pastry will lose its structural integrity.
5. Braiding and Filling
Roll the finished dough into a large rectangle. Cut 2cm wide strips along the outer thirds of the long sides, leaving the center third solid. Spread a thin layer of cream cheese and fruit jam down the center. Fold the strips over the filling in an alternating pattern to create the braid.
Pro Tip: Use a saucier to slightly warm your jam if it is too viscous to spread. This ensures an even layer that won't weigh down the delicate dough strips.
6. The Final Proof and Thermal Execution
Brush the braid with egg wash and let it proof at room temperature for 90 minutes until it looks puffy and "marshmallow-like." Bake at 200 degrees Celsius (400 degrees Fahrenheit) for 25 to 30 minutes. The high initial heat is required to trigger the steam expansion within the layers.
Pro Tip: Rotate the baking sheet halfway through the cycle. Even the best ovens have hot spots that can cause uneven browning on the delicate braided ridges.
Section B: Prep & Timing Fault-Lines:
The most common human error is rushing the proofing stage. If the dough is too cold when it enters the oven, the butter will melt and pool on the tray before the steam can lift the layers. Conversely, if the kitchen is too hot, the butter will soften during the braiding process. Technical Fix: If you notice the dough becoming sticky or "sweating" butter, immediately transfer it to the freezer for ten minutes to reset the temperature. Use an infrared thermometer to monitor your work surface; ideally, it should remain below 20 degrees Celsius.
THE VISUAL SPECTRUM
Section C: Thermal & Visual Troubleshooting:
Referencing our Masterclass photo, a successful Braided Danish Pastry should exhibit a deep mahogany crust on the ridges with a pale gold hue in the recessed folds. If your pastry is a uniform, dull tan, your oven temperature was likely too low, preventing the Maillard reaction from fully developing. If the fruit filling has bled out and turned the bottom of the pastry purple or red, the acidity has broken down the dough structure. Technical Fix: Thicken your filling with a small amount of cornstarch or pectin before application to increase its viscosity. If the braid looks "shaggy" or the layers have blurred together, you likely applied too much pressure with the rolling pin, crushing the delicate lamination.
THE DEEP DIVE
Macro Nutrition Profile:
Each serving (approximately 100g) contains roughly 380 calories, 22g of fat, 42g of carbohydrates, and 5g of protein. The high fat content is a byproduct of the lamination process, which is essential for the texture.
Dietary Swaps:
- Vegan: Substitute the butter with a high-quality vegan block butter (must be high in saturated fat, like coconut or palm base) and use almond milk and a flax-egg wash.
- Keto/GF: This is extremely difficult for laminated dough. A gluten-free flour blend with xanthan gum can work, but the "shatter" texture will be significantly diminished.
Meal Prep & Reheating Science:
To maintain the molecular structure, never microwave a Danish. The microwave agitates water molecules, making the crust rubbery. Instead, reheat in a 150-degree Celsius oven for 8 minutes to re-crisp the fat layers and restore the pastry's architectural rigidity.
THE KITCHEN TABLE
Why did my butter leak out during baking?
This usually indicates under-proofing. If the yeast hasn't produced enough gas to lift the layers, the butter melts and escapes before the dough sets. Ensure the pastry is visibly puffy and light before it hits the heat.
Can I use frozen fruit instead of jam?
Frozen fruit releases too much moisture as it thaws, which will steam the dough from the inside out and ruin the lamination. Always cook fruit down into a thick compote or use a high-solids jam.
Why is my pastry tough instead of flaky?
You likely over-mixed the initial dough or used flour with too much protein. Over-handling during the folding process also develops excess gluten. Treat the dough with a "gentle hand" to preserve the tenderness.
How do I get that professional shine?
The secret is a double-glaze. Brush with egg wash before proofing and again right before baking. For a mirror finish, brush the hot pastry with a simple syrup (equal parts sugar and water) the moment it leaves the oven.