Imagine the structural integrity of a high-rise skyscraper condensed into a handheld, spiralized masterpiece. We are not merely talking about snacks; we are discussing the architectural marvel known as Curly Pizza Twists. When you pull these golden, helical structures apart, the mozzarella does not just melt; it performs a high-tension structural failure that results in those iconic, translucent threads of dairy gold. The air in your kitchen transforms into a heavy, aromatic cloud of toasted yeast and piquant pepperoni oils. Every rotation of the dough is a calculated move to maximize surface area, ensuring that the Maillard reaction hits every single millimeter of the crust. This is where the physics of fermentation meets the artistry of the pizzaiolo. We are engineering a snack that defies the soggy limitations of a standard slice. By introducing a helical twist, we create a self-supporting lattice of carbohydrates and lipids that delivers a crunch so profound it resonates in your molars. Prepare your workstation; we are about to audit your culinary efficiency and upgrade your snack infrastructure.
THE DATA MATRIX
| Metric | Specification |
|---|---|
| Prep Time | 25 Minutes |
| Execution Time | 15 Minutes |
| Yield | 12 Helical Units |
| Complexity (1-10) | 4 |
| Estimated Cost per Serving | $0.85 USD |
THE GATHERS
Ingredient Protocol:
- 500g / 3.75 cups All-Purpose Flour (High-protein preferred)
- 325ml / 1.33 cups Warm Water (38 degrees Celsius)
- 7g / 2.25 tsp Active Dry Yeast
- 10g / 2 tsp Fine Sea Salt
- 15ml / 1 tbsp Extra Virgin Olive Oil
- 200g / 2 cups Low-Moisture Shredded Mozzarella
- 100g / 1 cup Finely Diced Pepperoni
- 5g / 1 tsp Dried Oregano
- 2g / 0.5 tsp Garlic Powder
- 120ml / 0.5 cup Marinara Sauce (For dipping)
Section A: Ingredient Quality Audit:
The primary failure point in Curly Pizza Twists is often the moisture content of the cheese. If you use "fresh" mozzarella stored in brine, the water will release during the thermal phase, turning your structural dough into a viscous, soggy mess. Fix: Only utilize low-moisture, part-skim mozzarella. If your yeast fails to bloom within five minutes, your water temperature is likely the culprit. Water above 45 degrees Celsius will terminate the yeast cells; water below 30 degrees Celsius will leave them dormant. Use a digital probe thermometer to ensure your hydration fluid is within the "Goldilocks" zone of 35 to 40 degrees Celsius. Finally, if your flour feels gritty or clumpy, sift it through a fine-mesh strainer to aerate the particles, ensuring a more uniform hydration during the mixing phase.
THE MASTERCLASS
1. Hydration and Activation
Begin by combining your warm water, yeast, and a pinch of sugar in the bowl of a stand mixer. Allow the mixture to sit until a thick, frothy "head" forms on the surface. This indicates the yeast is metabolizing and producing the carbon dioxide necessary for structural lift.
Pro Tip: Use a digital scale to measure your flour rather than volume cups. Flour density varies wildly based on humidity and packing technique; weight is the only universal constant in baking science.
2. The Primary Knead
Add the flour, salt, and olive oil to the yeast mixture. Using the dough hook attachment, knead on medium-low speed for approximately 6 to 8 minutes. The goal is to develop a robust gluten window, where a small piece of dough can be stretched thin enough to see light through it without tearing.
Pro Tip: Use a stainless steel bench scraper to clear the sides of the bowl. This ensures every gram of flour is incorporated into the mass, maintaining your calculated hydration ratio.
3. Dimensional Expansion
Place the dough in a lightly oiled bowl and cover with a damp cloth. Allow it to proof in a warm, draft-free environment until it has doubled in volume. This fermentation process allows the yeast to infuse the dough with complex esters and organic acids, elevating the flavor profile beyond simple starch.
Pro Tip: If your kitchen is cold, place the bowl inside an unlit oven with the interior light turned on. The small amount of heat from the bulb creates a perfect proofing chamber.
4. Integration and Helical Formation
Punch down the dough to degas it. Roll it out into a large rectangle on a floured surface. Spread a very thin layer of oil, followed by the garlic powder, oregano, diced pepperoni, and mozzarella. Fold the dough in half to trap the fillings. Use your bench scraper to cut the dough into 2cm wide strips.
Pro Tip: To achieve the "Curly" in Curly Pizza Twists, hold one end of the strip firm while rolling the other end away from you. This creates a high-tension spiral that locks the ingredients into the center.
5. Thermal Execution
Arrange the twists on a parchment-lined baking sheet. Brush the surfaces with a light egg wash to enhance the final aesthetic. Bake at 220 degrees Celsius (425 degrees Fahrenheit) for 12 to 15 minutes. You are looking for a deep, mahogany crust and bubbling cheese "volcanoes" at the twist junctions.
Pro Tip: Rotate the baking sheet 180 degrees halfway through the timer. Most home ovens have "hot spots" that can cause uneven thermal distribution and localized burning.
Section B: Prep & Timing Fault-Lines:
The most common human error is rushing the second proof. Once the twists are shaped, they need 10 minutes to "relax" before hitting the oven. If you skip this, the gluten will be too tense, causing the twists to shrink or snap during the bake. Additionally, ensure your pepperoni is diced into tiny fragments. Large slices act as structural "fault lines" that cause the twist to unravel. If your dough is too sticky to handle, dust your hands with flour, but do not add more flour to the dough itself, as this will render the final product dry and "bready" rather than crisp and chewy.
THE VISUAL SPECTRUM
Section C: Thermal & Visual Troubleshooting:
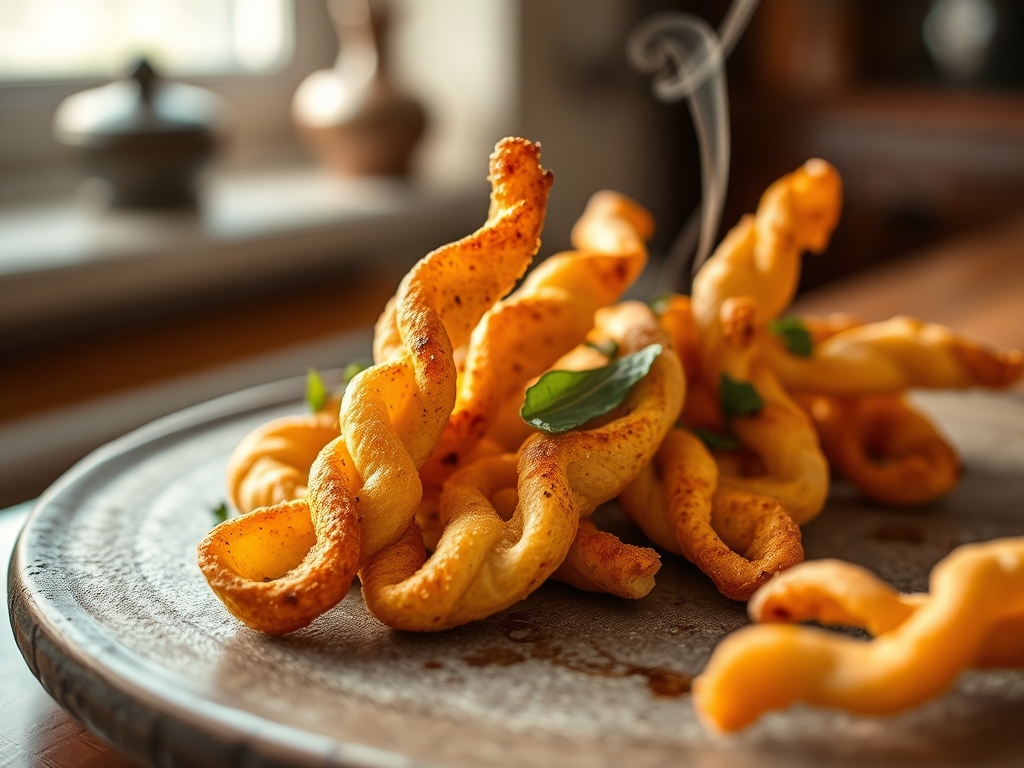
Referencing the Masterclass photo, your Curly Pizza Twists should exhibit a "tiger-striping" pattern of dark gold and pale cream. If your twists look pale and anaemic, your oven temperature was likely too low, preventing the sugars from caramelizing. If the cheese has turned brown and hard before the dough is cooked, you likely over-filled the twists. The visual cue for "done" is a rigid structure; the twist should not sag when picked up with tongs. If the spirals have unraveled into flat ribbons, the tension during the twisting phase was insufficient. Ensure the ends are "crimped" or tucked under the main body of the twist to maintain the helical integrity during the expansion phase.
THE DEEP DIVE
Macro Nutrition Profile
Each twist contains approximately 180 calories, 8g of protein, 22g of carbohydrates, and 7g of fat. The high protein content comes from the mozzarella and the gluten structure of the flour. While these are a treat, the use of olive oil provides heart-healthy monounsaturated fats compared to the saturated fats found in commercial "fast food" pizza.
Dietary Swaps
For a Vegan iteration, substitute the mozzarella with a cashew-based "cheese" and use a flax-egg for the wash. For a Gluten-Free version, utilize a high-quality 1-to-1 GF flour blend containing xanthan gum to replicate the elasticity of gluten. For Keto enthusiasts, replace the dough with a "Fathead" dough made of melted mozzarella, cream cheese, and almond flour.
Meal Prep & Reheating Science
To maintain the molecular structure when reheating, avoid the microwave at all costs. Microwaves vibrate water molecules, which turns the crust into a rubbery, inedible material. Instead, use an air fryer or a toaster oven at 180 degrees Celsius for 4 minutes. This re-renders the fats in the pepperoni and re-crisps the exterior lattice without drying out the interior crumb.
THE KITCHEN TABLE
Why are my twists soggy on the bottom?
This usually indicates the oven rack was too high or the baking sheet was cold. Use a preheated pizza stone or move the tray to the lowest rack for the final three minutes to ensure the base renders properly.
Can I make the dough in advance?
Absolutely. Perform a "cold ferment" by placing the dough in the refrigerator for up to 48 hours. This slow fermentation breaks down complex starches into simple sugars, resulting in a superior flavor and a more delicate crumb.
What is the best sauce for dipping?
A high-acidity marinara is essential to cut through the richness of the mozzarella. Look for sauces with minimal added sugar and a strong presence of fresh basil and crushed red pepper to provide a piquant contrast.
Why did my cheese leak out everywhere?
This is a sign of "over-stuffing." While it is tempting to maximize the dairy, the dough needs surface-to-surface contact to seal. Keep the cheese centered and leave a small margin at the edges before folding and twisting.