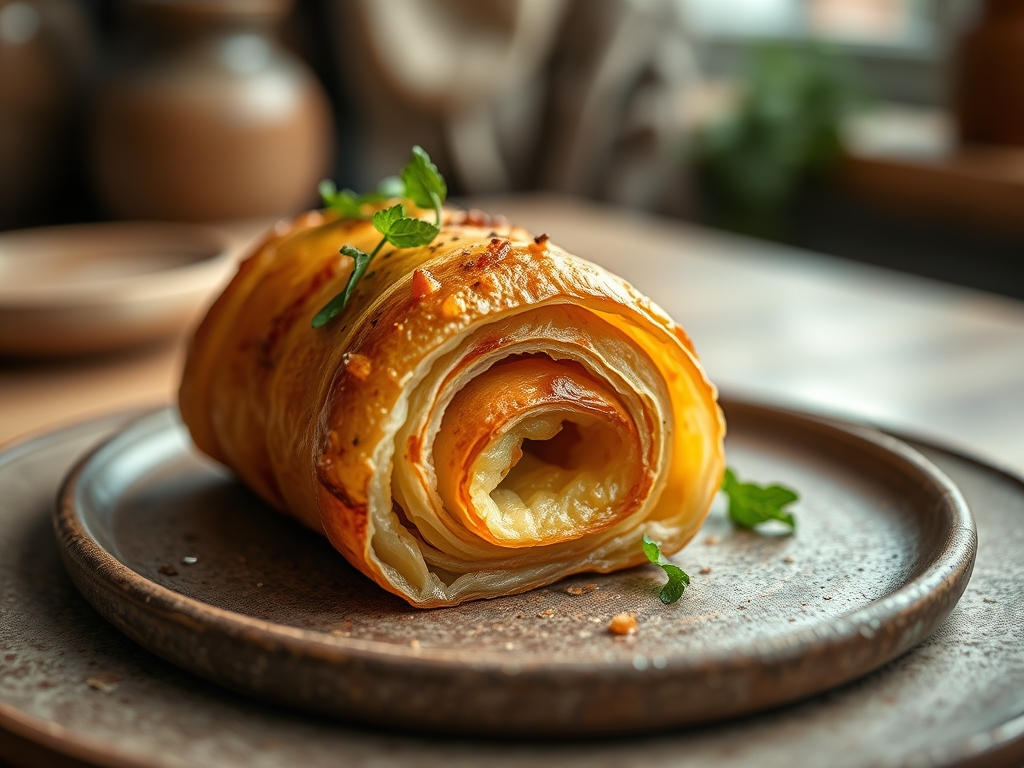
Listen to that sound. It is not just a crunch; it is the structural collapse of a thousand micro-laminations under atmospheric pressure. We are not merely baking here; we are conducting a high-stakes audit of steam dynamics and lipid suspension. The Coiled Puff Pastry represents the absolute peak of helical engineering in the culinary world. It is a tight, concentric spiral of alternating butter and dough that defies the standard horizontal plane of traditional puff. When the heat hits, the moisture in the butter flashes into steam, forcing the gluten layers apart in a violent, beautiful expansion. You want a pastry that shatters like glass but melts like silk. You want the golden, burnished exterior to give way to a tender, aerated core that smells of toasted hazelnuts and high-grade dairy. If your current pastry game feels flat, static, or structurally unsound, you are in the right place. We are about to recalibrate your kitchen for maximum flake and total textural dominance.
THE DATA MATRIX
| Metric | Specification |
|---|---|
| Prep Time | 45 Minutes (Active) |
| Execution Time | 4 Hours (Includes Chilling) |
| Yield | 12 Large Coils |
| Complexity (1-10) | 8 (Precision Mandatory) |
| Estimated Cost per Serving | $1.25 / Unit |
THE GATHERS
Ingredient Protocol:
- 500g / 4 cups All-Purpose Flour (11.5% protein content)
- 10g / 2 tsp Fine Sea Salt
- 250ml / 1 cup Ice-Cold Filtered Water
- 400g / 1.75 cups High-Fat European Style Butter (Minimum 82% butterfat)
- 50g / 3.5 tbsp Melted Butter (For the initial "detrempe")
- 1 Large Egg + 15ml / 1 tbsp Heavy Cream (For the "glaze")
Section A: Ingredient Quality Audit:
If your flour has a protein content lower than 11%, your helical structure will lack the tensile strength to hold the coil; it will slump into a sad, buttery puddle. To fix this, replace 10% of your flour with bread flour to boost the gluten network. If your butter is standard supermarket fare with high water content, the steam release will be too aggressive, causing the layers to separate prematurely and lose definition. Always seek out "European Style" or "Cultured" butter. If your water is not "ice-cold," it will prematurely melt the lipid particles during the mixing phase, destroying the lamination before it even hits the oven. Use a digital thermometer to ensure your liquids are below 4 degrees Celsius.
THE MASTERCLASS
1. The Detrempe Construction
Combine your flour, salt, and melted butter in a large bowl. Gradually add the ice water while mixing with a bench scraper. You are looking for a cohesive mass that is hydrated but not sticky. Do not overwork the dough; we want to develop just enough gluten to provide a framework, not a rubbery shell.
Pro Tip: Use your bench scraper to "cut" the water into the flour. This prevents the warmth of your hands from elevating the dough temperature, which would compromise the structural integrity of the starch molecules.
2. The Butter Block Calibration
Place your cold, high-fat butter between two sheets of parchment paper. Use a heavy rolling pin to pound it into a precise 15cm square. It must be pliable but cold; it should bend without snapping. This is the "plastic" state required for successful lamination.
Pro Tip: Check the temperature with an infrared thermometer. Ideally, the butter and the dough should be within 2 degrees of each other to ensure they roll out as a single, homogenous sheet rather than the butter breaking into shards.
3. The Lamination Sequence
Encase the butter block in your dough and roll it out into a long rectangle. Perform a "letter fold" by folding the top third down and the bottom third up. Rotate 90 degrees and repeat. You will perform a total of six "single turns," chilling the dough for 30 minutes between every two turns.
Pro Tip: Use a digital scale to weigh the dough after each turn. If it is losing significant weight, you are losing moisture to the atmosphere; wrap it more tightly in plastic film to preserve the hydration levels.
4. The Helical Coiling
Roll the finished pastry out to a thickness of 3mm. Cut the sheet into long, thin strips approximately 2cm wide. Roll each strip tightly into a spiral, ensuring the edges are flush. Place these coils into a buttered muffin tin or pastry rings to maintain their shape during the expansion phase.
Pro Tip: Use a pizza wheel or a sharp pastry cutter for this. A dull blade will "smear" the layers together at the edges, effectively sealing them shut and preventing the steam from forced expansion.
5. The Thermal Execution
Brush the tops with your egg and cream glaze. Bake at 200 degrees Celsius for the first 10 minutes to trigger the "oven spring," then reduce to 175 degrees Celsius for an additional 20 minutes to render the fat and achieve a deep, mahogany color.
Pro Tip: Place a heavy baking stone on the rack below your pastry. This acts as a thermal heat sink, ensuring that the bottom of the Coiled Puff Pastry receives consistent conductive heat to prevent a "soggy bottom."
Section B: Prep & Timing Fault-Lines:
The most common failure in this protocol is "rushing the rest." If the gluten is not allowed to relax between turns, the dough will shrink back, resulting in a tough, chewy texture rather than a delicate flake. If you notice the dough resisting the rolling pin, stop immediately and refrigerate for 20 minutes. Another critical error is "over-proofing" if using a yeast-leavened version; for this unleavened version, the danger is "ambient melt." If your kitchen is above 22 degrees Celsius, you must work over an ice bath or move the dough in and out of the freezer every 5 minutes.
THE VISUAL SPECTRUM
Section C: Thermal & Visual Troubleshooting:
Look at the Masterclass photo above. Notice the "shattered" appearance of the top layers and the distinct, concentric circles. If your coils look "fused" or "blurry," your butter was too soft during the rolling process. If the center of the coil has popped up like a volcano, you rolled the strips too tightly; the steam had nowhere to go but up. If the color is pale and anemic, you likely skipped the heavy cream in the glaze or your oven calibration is off. A perfect Coiled Puff Pastry should exhibit a "gradient of gold," ranging from pale straw in the tightest crevices to a deep, piquant bronze on the outer edges.
THE DEEP DIVE
Macro Nutrition Profile:
These are high-density energy units. Each coil contains approximately 320 calories, with 22g of fat, 28g of carbohydrates, and 4g of protein. They are designed for sensory indulgence, not caloric restriction.
Dietary Swaps:
- Vegan: Substitute the butter with a high-quality plant-based block that has a high melting point (stearate-rich). Avoid soft tub margarines.
- Gluten-Free: Use a 1:1 GF flour blend with added xanthan gum. Note that the "flake" will be more granular and less "shattery" due to the lack of long-chain gluten proteins.
- Keto: This is functionally impossible with traditional lamination; however, "fathead" dough can be spiraled, though it will lack the steam-driven expansion of a true puff.
Meal Prep & Reheating Science:
To maintain the molecular structure, never microwave. Microwaves agitate water molecules, turning the crisp starch into a soft, rubbery mess. Reheat in a 160 degree Celsius oven for 8 minutes to re-crisp the lipid layers and aerate the core. You can freeze the raw coils for up to 3 months; bake them directly from frozen, adding 5 minutes to the initial high-heat phase.
THE KITCHEN TABLE
Why did my butter leak out onto the tray?
Your oven temperature was too low. The butter melted before the steam could expand the dough and "set" the structure. Ensure your oven is fully preheated to 200 degrees Celsius before entry.
Can I use a food processor for the dough?
Only for the initial mixing of the detrempe. If you use it for the lamination, you will pulverize the butter layers, resulting in a shortcrust texture rather than a flaky puff.
My pastry is oily but not crisp. What happened?
This is a "render failure." The pastry was likely removed too early. The fat must fully render out of the layers and fry the starch in situ to create that characteristic crunch.
How do I get that professional shine?
The secret is the heavy cream in the egg wash. The proteins in the cream provide a "lacquer" effect, while the sugars in the milk contribute to a more intense Maillard reaction.