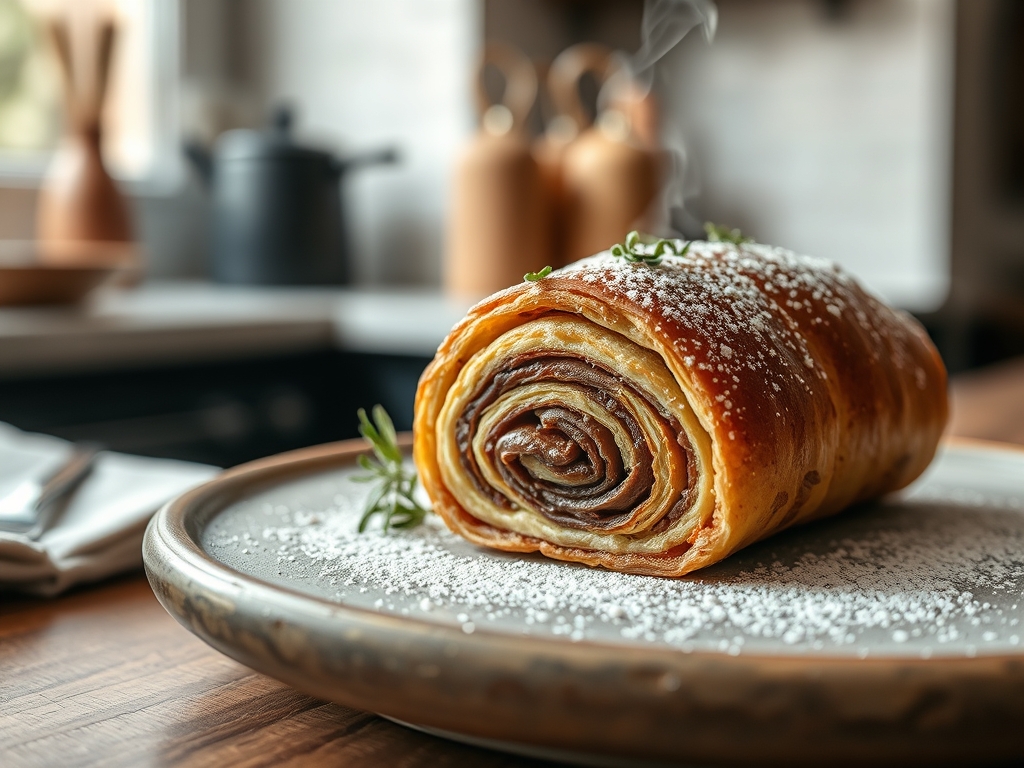
Listen up, kitchen operatives. We are moving beyond the amateur hour of standard laminated dough and entering the realm of high-performance architectural baking. Forget the flat, flaky triangles of your youth. We are here to discuss the Pain au Chocolat Roll; a structural masterpiece designed for maximum surface area caramelization and symmetrical protein distribution. Imagine a cylindrical chassis of butter-leavened dough, spiraled with such precision that every bite delivers an identical ratio of bittersweet cocoa solids to shatter-crisp pastry. This is not just breakfast; it is a thermal event. When that cold butter hits a preheated deck oven, the water content flashes into steam, forcing the gluten layers apart in a violent display of mechanical leavening. The result is a golden, honeycombed interior protected by a Maillard-rich exterior that shatters like tempered glass. If you are looking for a soft, pillowy bun, you are in the wrong audit. We are here for the crunch, the flake, and the dark, viscous heart of the finest chocolate batons money can buy.
THE DATA MATRIX
| Metric | Specification |
|---|---|
| Prep Time | 45 Minutes (Active) |
| Execution Time | 18 Hours (Inc. Proofing) |
| Yield | 12 Units |
| Complexity | 8 / 10 |
| Estimated Cost per Serving | $1.45 |
THE GATHERS
Ingredient Protocol:
- 500g / 4 cups Strong Bread Flour (12.5 percent protein minimum)
- 60g / 0.25 cup Granulated Sugar
- 10g / 2 tsp Fine Sea Salt
- 10g / 1 tbsp Instant Yeast
- 280ml / 1.15 cups Whole Milk (Chilled to 4 degrees Celsius)
- 50g / 3.5 tbsp Unsalted Butter (Softened for the dough)
- 250g / 1.1 cups High-Fat European Butter (82 percent fat for the lamination block)
- 24 units Dark Chocolate Batons (44 percent cocoa solids minimum)
- 1 unit Large Egg (For the wash)
Section A: Ingredient Quality Audit:
The primary failure point in a Pain au Chocolat Roll is the butter plasticity. If your butter has a high water content, it will evaporate too quickly, leading to a greasy finish rather than distinct layers. Always source European-style butter with at least 82 percent butterfat. If your flour lacks sufficient protein, the gluten network will collapse under the weight of the fat; ensure you are using "Strong" or "Bread" flour. If your yeast is sluggish, the dough will not aerate properly during the final proof, resulting in a dense, leaden roll. Test your yeast in a small amount of warm milk before committing to the full build.
THE MASTERCLASS
1. The Detrempe Formation
Combine your flour, sugar, salt, and yeast in the bowl of a stand mixer. Slowly infuse the chilled milk while mixing on low speed. Add the 50g of softened butter once a shaggy mass forms. Develop the gluten until the dough is smooth but not overly elastic. Use a digital scale to ensure precision; even a five-gram variance can compromise the structural integrity.
Pro Tip: Keeping the milk chilled prevents the friction of the mixer from overheating the dough, which would prematurely activate the yeast and ruin the lamination.
2. The Butter Block Integration
Roll your 250g of cold butter between two sheets of parchment paper into a perfect rectangle. This is your "beurre manic." Encase this block within your chilled dough, ensuring the edges are sealed perfectly with a bench scraper. This creates the initial "sandwich" required for the folding process.
Pro Tip: The butter and the dough must be the same temperature and consistency. If the butter is too hard, it will snap; if it is too soft, it will emulsify into the dough, destroying your layers.
3. The Lamination Cycle
Perform three "letter folds." Roll the dough out into a long rectangle and fold it in thirds like a document. Chill the dough for 30 minutes between every single fold. This resting period allows the gluten to relax and the butter to re-solidify, ensuring the layers remain distinct.
Pro Tip: Use a bench scraper to keep your edges square. Square edges lead to even layers; rounded edges lead to scrap waste and uneven baking.
4. Precision Cutting and Loading
Roll the final dough to a thickness of 4mm. Cut into long, even strips. Place two chocolate batons at the base of each strip and roll tightly to create the signature cylindrical shape. Ensure the seam is tucked firmly underneath to prevent unravelling during the bake.
Pro Tip: Professional bakers use a rolling pizza cutter or a specialized multi-wheel pastry cutter to ensure every Pain au Chocolat Roll is identical in mass and volume.
5. The Final Proof and Thermal Execution
Place the rolls on a lined sheet pan and proof at 25 degrees Celsius for two hours. They should double in size and wobble slightly when shaken. Brush with a thin layer of egg wash. Bake at 190 degrees Celsius for 18 to 22 minutes until the exterior is deeply bronzed and the internal layers are fully rendered.
Pro Tip: Do not over-proof. If the internal temperature exceeds 28 degrees Celsius during proofing, the butter will melt out of the layers before the oven can set the structure.
Section B: Prep & Timing Fault-Lines:
The most common human error is rushing the chilling phases. If the dough is not sufficiently rested, it will "spring back" during rolling, leading to thick, doughy sections. Furthermore, if the oven is not fully preheated, you will lose the initial "oven spring" required to separate the layers. Use an independent oven thermometer to verify your deck temperature.
THE VISUAL SPECTRUM
Section C: Thermal & Visual Troubleshooting:
Look at the reference image above. Notice the "honeycomb" cross-section and the high-gloss sheen on the exterior. If your rolls appear dull, your egg wash was too thin or applied too early. If the bottom of the roll is burnt while the center is raw, your baking stone is too hot; move the tray to a higher rack. If the chocolate has seized or turned grainy, it likely contains too many stabilizers; switch to a high-quality couverture baton that is designed to melt and then reset with a viscous texture. Uneven browning usually indicates "hot spots" in your oven; rotate the tray 180 degrees halfway through the bake.
THE DEEP DIVE
Macro Nutrition Profile:
Each roll carries approximately 380 calories, with 22g of fat, 42g of carbohydrates, and 6g of protein. The high fat content is essential for the texture, while the protein provides the structural scaffolding.
Dietary Swaps:
- Vegan: Substitute the butter with a high-quality plant-based laminate fat (usually coconut or palm-based) and use soy milk. Ensure the chocolate is dairy-free.
- Keto/GF: Extremely difficult due to the reliance on gluten for lamination. Use a mix of almond flour and xanthan gum, though the "shatter" effect will be significantly diminished.
Meal Prep & Reheating Science:
To maintain the molecular structure, never microwave a Pain au Chocolat Roll; the localized heating will turn the butter into a liquid and make the dough soggy. Instead, reheat in a 150-degree Celsius oven for 5 minutes to recrystallize the fats and crisp the exterior.
THE KITCHEN TABLE
Why did my butter leak out during baking?
This usually happens because the proofing temperature was too high or the oven was too cold. If the butter melts before the flour proteins "set," the fat has nowhere to go but onto the baking sheet.
Can I use chocolate chips instead of batons?
You can, but it is a tactical error. Batons are engineered to maintain their shape and provide a continuous "core" of chocolate. Chips will scatter and create uneven pockets of sweetness throughout the roll.
How do I get that professional shine?
The secret is a double-glaze. Apply a thin egg wash before proofing and a second, very light coat right before the tray enters the oven. This creates a durable, high-gloss protein film.
My pastry is flaky but the middle is doughy. Help!
Your oven temperature is likely too high. The exterior is browning and setting before the heat can penetrate the center. Lower the temperature by 10 degrees and extend the bake time by five minutes.