Listen up, culinary engineers. We are not just baking; we are conducting a high-stakes structural audit of gluten and chlorophyll. When you approach a Braided Pesto Bread, you are managing a complex interplay between a fermented dough matrix and a high-lipid herbaceous laminate. This is a sensory assault of the highest order. Imagine the scent of toasted pine nuts colliding with the yeasty perfume of a perfectly proofed crumb. The visual is even more aggressive. You have vibrant, emerald-green swirls of basil paste fighting for dominance against a golden, oven-seared crust. This is not a casual snack. It is a technical masterpiece that requires precise temperature control and an eye for architectural symmetry. If your dough is too slack, the braid collapses into a puddle of oil. If it is too stiff, you lose that ethereal, pillowy interior that makes this loaf legendary. We are here to ensure your execution is flawless, your crumb is open, and your pesto remains piquant through the thermal gauntlet of the oven.
THE DATA MATRIX
| Metric | Specification |
|---|---|
| Prep Time | 25 Minutes (Active) |
| Execution Time | 3 Hours (Including Proofing) |
| Yield | 2 Large Loaves |
| Complexity (1-10) | 7.5 (Structural Integrity Focus) |
| Estimated Cost per Serving | $1.15 USD |
THE GATHERS
Ingredient Protocol:
- 500g / 4 cups All-Purpose Flour (High protein preferred)
- 325ml / 1.3 cups Lukewarm Water (38C / 100F)
- 7g / 2.25 tsp Active Dry Yeast
- 10g / 2 tsp Fine Sea Salt
- 15ml / 1 tbsp Honey or Granulated Sugar
- 30ml / 2 tbsp Extra Virgin Olive Oil
- 180ml / 0.75 cup High-Quality Basil Pesto (Cold)
- 50g / 0.5 cup Grated Parmesan Cheese
- 1 Large Egg (For wash)
Section A: Ingredient Quality Audit:
The primary failure point in Braided Pesto Bread is oil separation. If your pesto is too viscous or lacks emulsification, the oil will leach into the dough during the bake; this creates a "fried" texture rather than a baked one. If your pesto looks oily, whisk in a teaspoon of breadcrumbs to bind the excess lipids. Furthermore, check your yeast vitality. If your water is above 43C (110F), you will murder the micro-organisms. Use a digital probe thermometer to verify the thermal environment before introducing the yeast. If using store-bought pesto, look for a vibrant green color. Dull, brownish pesto indicates oxidation and will result in a visually unappealing interior.
THE MASTERCLASS
1. Hydration and Autolyse
Combine your water, yeast, and sugar in the bowl of a stand mixer. Let it bloom until foamy. Add the flour and salt, then mix until a shaggy mass forms. Cover and let it rest for 20 minutes. This allows the flour to fully hydrate before the mechanical kneading begins.
Pro Tip: Use a digital scale for all measurements. Volume is the enemy of consistency. The autolyse phase allows gluten bonds to begin forming without manual labor; this results in a more extensible dough that is easier to braid.
2. The Kinetic Development
Attach the dough hook and knead on medium speed for 8 to 10 minutes. You are looking for the "windowpane test" where a small piece of dough can be stretched thin enough to see light through it without tearing.
Pro Tip: Use a bench scraper to clear the sides of the bowl. Proper gluten development ensures the dough can support the weight of the heavy pesto filling without losing its aerate quality during the final rise.
3. Primary Fermentation
Place the dough in a lightly oiled bowl. Cover with a damp cloth and let it rise in a draft-free environment until doubled in size. This usually takes 60 to 90 minutes depending on your ambient kitchen temperature.
Pro Tip: If your kitchen is cold, place the bowl inside a turned-off oven with a pan of steaming water on the rack below. This creates a makeshift proofing box that maintains a steady 27C (80F) environment.
4. Lamination and Structural Weaving
Punch down the dough and divide it into two equal portions. Roll each out into a large rectangle. Spread a thin, even layer of pesto over the surface, leaving a small border. Roll the dough tightly into a log, then use a sharp knife or bench scraper to slice the log in half lengthwise, exposing the green layers.
Pro Tip: Keep your pesto cold. Cold pesto is less likely to run or infuse into the dough prematurely. The exposed layers are what create the stunning visual contrast seen in professional bakery audits.
5. The Braiding Maneuver
Twist the two halves over each other, keeping the cut sides (the pesto layers) facing upward. Pinch the ends firmly to seal the structure. Transfer the loaves to a parchment-lined baking sheet and let them rise for another 45 minutes.
Pro Tip: Do not over-handle the dough at this stage. You want to maintain the tension in the twist. A tight braid ensures that the steam released from the pesto stays trapped within the dough layers, creating a moist crumb.
6. The Thermal Finish
Brush the exposed dough with an egg wash and sprinkle with Parmesan. Bake at 190C (375F) for 30 to 35 minutes. The internal temperature should register 90C (195F) on an instant-read thermometer.
Pro Tip: The egg wash facilitates the Maillard reaction, providing that deep mahogany color. If the bread browns too quickly, tent it with foil to prevent the delicate basil from scorching and becoming bitter.
Section B: Prep & Timing Fault-Lines:
The most common human error is rushing the second proof. If the dough hasn't expanded sufficiently before hitting the heat, you will experience "oven spring" so violent that the braid ruptures. This destroys the aesthetic. Conversely, over-proofing leads to a collapsed structure that cannot support the pesto. Use the "poke test": if the dough springs back slowly and leaves a small indentation, it is ready for the oven.
THE VISUAL SPECTRUM
Section C: Thermal & Visual Troubleshooting:
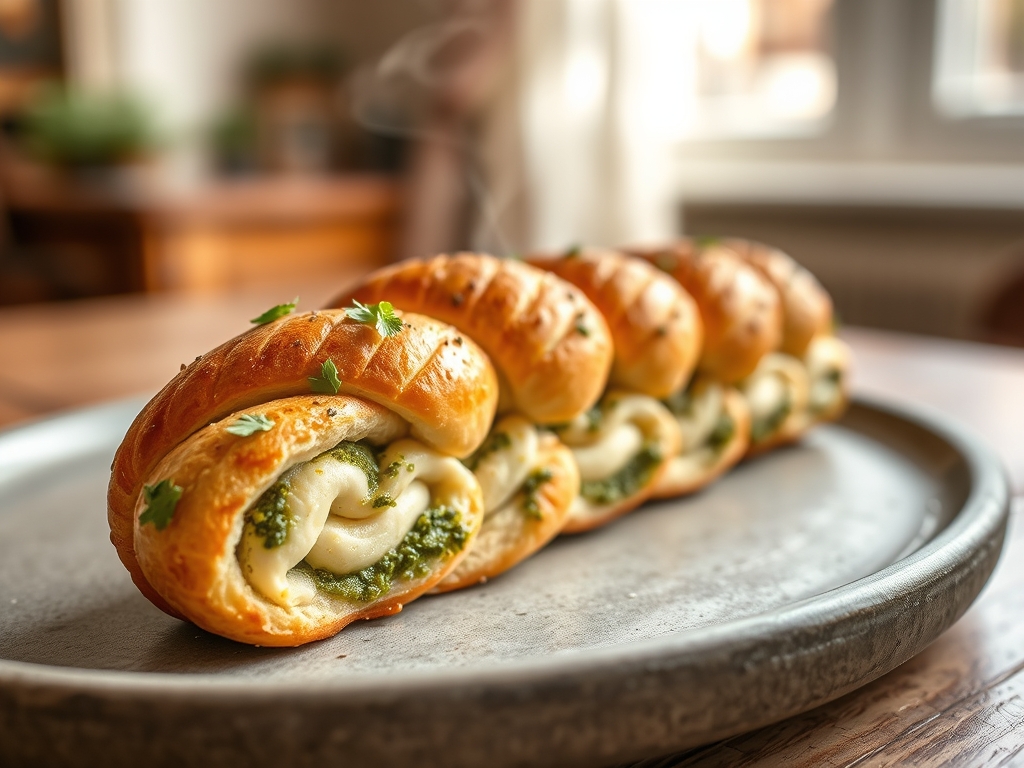
Look at the Masterclass photo. Notice the high-contrast definition between the golden crust and the deep green pesto. If your loaf looks muddy, your pesto was likely too thin or you overworked the dough during the twist. If the bottom is soggy, you likely used too much oil in the pesto or failed to bake it on a preheated heavy-duty baking sheet. To achieve that specific "shimmer" seen in the photo, ensure your egg wash is whisked with a teaspoon of water to break the proteins; this allows for a thinner, more even coating that doesn't pool in the crevices.
THE DEEP DIVE
Macro Nutrition Profile
Each serving (approximately one thick slice) contains roughly 280 calories. You are looking at 8g of protein, 35g of carbohydrates, and 12g of fats. The fats are primarily unsaturated, coming from the olive oil and pine nuts in the pesto.
Dietary Swaps
- Vegan: Replace the honey with agave, use a flax-egg for the wash, and ensure your pesto uses nutritional yeast instead of Parmesan.
- Keto/GF: This specific structural braid is difficult with alternative flours. However, a high-quality 1-to-1 gluten-free blend with added xanthan gum can work, though the crumb will be denser.
Meal Prep & Reheating Science
To maintain the molecular structure, do not microwave this bread. Microwaves cause the starch molecules to undergo rapid retrogradation, resulting in a rubbery texture. Instead, reheat slices in a 150C (300F) oven for 5 minutes. This gently warms the lipids in the pesto and crisps the crust without drying out the interior.
THE KITCHEN TABLE
Why is my pesto bread soggy in the middle?
This usually indicates under-baking or excessive oil in the filling. Always use a thermometer to confirm an internal temp of 90C. If the exterior is dark but the center is wet, lower the oven temp and bake longer.
Can I use red pesto instead?
Absolutely. A sun-dried tomato pesto provides a piquant, acidic profile that works beautifully. The structural rules remain the same; ensure the pesto is thick and not swimming in excess oil before spreading it onto your dough.
My braid unraveled during the bake. What happened?
You likely didn't pinch the ends with enough force. Use a drop of water on your fingers to "glue" the dough ends together before tucking them under the loaf. Tension is key to a successful architectural bake.
How do I get a softer crust?
For a softer, brioche-style finish, swap the water for whole milk and increase the butter content. Brush the loaf with melted butter immediately after it exits the oven to trap steam and soften the exterior proteins.